• Skip to primary navigation
  • Skip to main content
  • Skip to footer

Houston's Premier Scuba and Dive Shop Oceanic Ventures Inc.

(713) 523-3483 (dive)
5808 Newcastle Drive
Houston, TX 77401

  • Home
  • Stay Current
    • Our Blog
    • Travel and Events Calendar
    • Club Aquarius Social Club
      • Club Aquarius Social Club Upcoming Events
      • Club Aquarius Social Club – The Past
    • Special Events
    • Local Scuba Diving Events
    • Photography Contest
    • Categorized Blog Posts
  • Equipment
    • Dive Equipment
    • Rebreather Systems
    • Cruise Ship Passengers
    • Repair & Maintenance
    • Air & Mixed Gas Blending
    • Pure Fiji Spa Products
  • Training
    • Become a Scuba Diver
    • Scuba In Your Home or Ours
    • Diving Programs for Young Explorers
    • Recreational Dive Courses
      • Recreational Dive Courses overview
      • The Briar Club Scuba Program
      • West University Scuba Program
      • Houstonian Scuba Program
    • Technical Diving Courses
      • Basics
      • Nitrox
      • Trimix
      • Rebreather
      • Wreck Diving Programs
      • Cave Programs
      • Blending
    • Leadership Dive Courses
  • Travel
    • Travel Escorted Adventures
    • Travel – Other Travel Programs
    • Travel – Custom Travel Adventures
    • Local Scuba Diving Events
    • Technical Travel
    • Scuba Diving Around Texas
    • Travel Insurance
    • Travel Forms
  • Company
    • About Oceanic Ventures
    • Meet Our Team
    • Testimonials
    • Facility Hours
    • Map
    • Oceanic Ventures Foundation
    • Resources & Articles
    • Archive
  • Shop
    • Online Store
    • Cart
    • Checkout
    • My Account
    • Policies regarding Privacy and Purchases
  • Contact

Photograph

February 16, 2016 by Eric Keibler

Travel and Adventure Photography – Nine Hints for Underwater Photographers

In reading Helen Jung’s article, Secrets to Traveling like a Local, I thought about how to apply some of her hints to diving travel photography.   We have a lot of the same issues but when you add underwater photography to the mix, it opens a whole new world in travel photography.  Here are some hints I came up with:

20090908-IMG_1109Study before you go.

You should look at what others have done so you have an idea of what iconic photographs represent the location. If you were going to Paris, you would want a photograph of the Eiffel tower.  The same applies to your underwater trip.  What creatures, people, and places did others find interesting?  Finding out where these things might be located will help you capture images that encompass your trip.

Ask Questions.

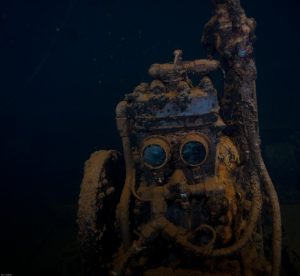
Talk to people who have been diving there and find out what they found interesting.  Keep an open mind.  You might not be interested in a Japanese Communication Bunker in Chuuk but the view from the top is wonderful.

Penetration - Truk LagoonTalk to the Dive Master.

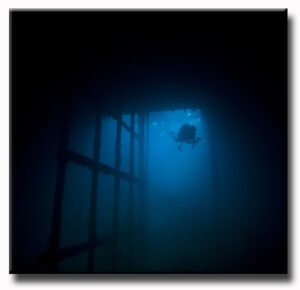
Remember, local knowledge is a big plus in photography, especially in underwater photography.  I remember one dive in Chuuk, where I went on a photography dive with Todd Emmons, the lead Master on the Odyssey.  He led me through the ship and acted as the model for a series of photographs.  I still had to interpret  each site, but he knew where others had made beautiful photographs in the past.  He also had some new places where he thought there was potential for some fun photographs.

Photography by Ann KeiblerForce yourself to push the envelope.

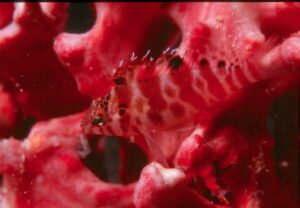
I am a die-hard wide-angle photographer.  I love the expansive scenics both above and below the surface.  However, many locations are really best captured using a macro or super macro lens.  So, while I can always fall back on wide-angle, I have to force myself to concentrate on Macro photography.  This was especially true in Indonesia where there are some incredible opportunities for Macro photography.

“Don’t be a Jerk.”

I cannot stress this enough!  I can write an entire article on being a good photographer underwater but I will just touch on a few things for now.  You need to be respectful of the people, places and the environment.  This is especially true underwater where the marine life is fragile and very susceptible to damage.  If you cannot get the shot without damaging the surrounding coral or other creatures (this includes hanging on) then pass on the shot or approach it a different way.  You have to be aware of your body position, fins, hands, etc so that you don’t damage the surrounding environment.  Another aspect of this is being respectful to the rest of the group.  If you are diving with a group, you owe it to them to remain a part of the group and not lag too far behind.  You may to have to pass on some shots to make up for the one you just took in order to stay with the group.  If you find this difficult, hire your own Dive Master and boat and you can then set the timing of the dive.

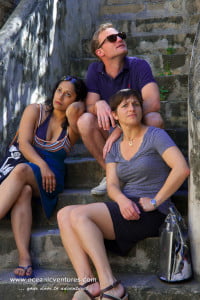
Talk to your taxi driver and other locals.

Remember, they know a lot about the area you are visiting.  They can be a good resource for fun things to do and entertaining things to see and do.  They can also be your pathway to understanding the local culture and customs more which will help your photography.

It is ok to be a tourist.

You are a tourist after all so it is ok to be one.  Don’t miss some of the touristy spots because some of them are really fun.  If you want a challenge, get the classic shot and then find different ways to portray the spot in your images.  Ask Ann, she loves macro photography and sometimes tree bark can be cool.

fiji-403
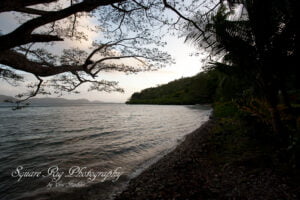
Get up early and stay up late.

There is nothing like a sunrise or sunset right?  Well, it can really be special to be up when it goes from dark to light even before the sun starts to rise on the horizon.  Photographers call this the “Blue Hour” and it occurs twice a day – before sunrise and after sunset.  The lighting is magical so don’t miss it.  You can always take a nap or sleep when you get home.

Alex & the Girls“Give yourself permission to look and act foolish sometimes.”

“It’s OK to ask for help or not to know how to do something. You’ll get more out of a trip if you put those reservations aside.”


In both travel photography and underwater photography, we try to tell a story.  There is always a story, we just have to find the one we want to tell but that is a thought for another day…

Filed Under: Photography, Uncategorized, Underwater Tagged With: Photograph, photography, Surface Photography

February 7, 2011 by ederwin

Between Scuba Dives – Tips for Flower Photography

Start early in the day – Before the sun heats up the land there is usually far less wind, causing blur. Also, there is often dew on the flowers (or frost in winter), which can add another dimension to your pictures.
Photographs in the Sun – Flowers look great in the sun with the naked eye, but neither film nor digital can cope with the increased contrast. Overcast conditions are usually best, colors then saturate and your pictures will still look really bright, but even more colorful. There are exceptions to this though – for example, sunlight can create dark shadows behind your sunlit subject, creating an excellent non-distracting background.  If you are going to take flower pictures in sunlight, try using a polarizing filter to reduce glare and enhance the colors. For best color results, shoot blue or violet flowers early in the morning, yellows in mid-morning or mid-afternoon and reds in late afternoon.   – Place a diffusion screen between the flower you are photographing and the sun. You can completely block the sun and put your flower in shade, then redirect some light back on the flower with a reflector. This reflector can be a commercially made reflector or just something reflective like a white T-shirt or a piece of foam core (also try gold or silver reflectors). Another photographic technique would be to use fill flash.  If your camera has an automatic fill flash function then give it a try.  Experiment with the lighting ratio if your camera will let you change the flash output.  Having the flowers backlit by either the sun or an off-camera flash will brighten and highlight flower petals. 
Use Lower ISO settings on your Digital Camera – To get the lowest noise, (similar to grain in film) most digital cameras work best at ISO 200, so use this setting and a tripod for best results.
Control your depth of field – If you are photographing a single flower with a busy background then use a wide aperture to selectively focus on the flower and blur out the background. Conversely, if you are photographing a field of flowers the use a smaller aperture setting to bring most, if not all the flowers into focus.  If your camera has a depth of field preview then this is the time to use it.  To blur your backgrounds, use a large aperture (small number like f5.6) to avoid distracting backgrounds. Using your camera’s depth of field preview feature is the best way to ensure that you’ve blurred the background – and still got enough of the flower in focus
Spot focus – The normal focus mode of most digital cameras is some sort of average focus mode.  That means that the camera will try to look at an area and base the focus on an area of what it sees.  It’s better for close up photography to put the camera into spot focus mode, this will allow you to see exactly what the camera will be focusing on.
Multiple photographs – Set up your first shot to include the whole flower then concentrate on the details of the flower that attract your eye. Focus on the color or small details of the flower.  Photograph your flowers from different angles. Shoot straight down, from the side, from the underneath, just change it up a little.  Shoot horizontal and vertical.  Position yourself low to the ground to give the perspective of the flowers.  If you kneel or lie down on the same level as the subject, the flowers will appear larger in the photograph, and they will fill up more of the frame. The low perspective also keeps you from shooting the tops of your subjects’ heads and making the flowers look small in the photos.

TECHNICAL STUFF…

Use a tripod – getting close increases the chance of camera shake, so it’s best to use a tripod whenever possible. It also slows down the picture-taking process, which means you have more time to concentrate on the composition
Shoot RAW format files – If you have a camera that will allow you this option. You can only get the most from your pictures by shooting RAW – the highest quality.  For Cameras without RAW File Option, use the highest quality JPEG that your camera allows you to choose. You can usually find this setting somewhere in the menu screens. If your camera has a screen with a histogram (the histogram is the little graph looking thing on the menu screen), always view the screen after your first shot and at the beginning of every series of shots with the same subject. The most computerized matrix meters can’t always get the correct exposure. One of the major advantages with shooting digital: you can see what you have right on the site, and, you can see exactly if you have obtained all of the information available simply by looking at the histogram. A good histogram will have the whole curve within the confines of the box, and not have most of the data up on one side or the other of the box. Especially avoid going over the edge of the right side of the box. That means you have lost the data in the lighter parts of your subject and you can never get it back.
DIGITAL Storage Cards ‘FILM’ – This consists of CF (CompactFlash) or the smaller SD (Secure Digital) cards. These can be used over and over again indefinitely. After you upload your full card to your computer you should ‘Reformat’ the card INSIDE the camera for the next batch as opposed to just deleting the files. Reformatting leads to less storage errors in the future.  CompactFlash cards are basically faster and larger capacity than SD cards.  If you have a choice in your camera, choose CompactFlash. They are priced based on write speed, the faster the more expensive. Write speed isn’t all that important for flower photography. Use multiple cards, because you don’t want all of your eggs in one basket, right? 200 full RAW images per card is a good standard to use.

Filed Under: Digital, Photography, Travel Tagged With: flower, Photograph, photography, Scenics, Surface Intervals

December 8, 2007 by Eric Keibler

Santa Blowing Bubbles

Eric With SantaHo, Ho, Ho! 

Nollaig Shona or Happy Christmas!

 
Hey kids, did you know Santa was a diver?  Well, on December 7 at the West University pool Santa made an appearance in his scuba equipment and posed for photographs.  It was amazing to see Mr. Clause swim around the pool, his beard flowing, a red wetsuit complete with fur trimming and a Zeagle BCD!  It is not everyday you get to see such a site.
To keep Santa company on this visit, several members of the Oceanic Ventures family, Barney Corbin, Barbara Corbin, Zaide Scheib and yours truly, helped to take photographs and hand out diving magazines prneuded by Mark Young at Dive Training magazine.  The pool prneuded hot chocolate, which was not in high demand on the 72 degree day and life-guards to make sure that everyone had a good time.
Funny as it may sound, there were more adult visitors than there were children.  Of course, they say we are all children inside and the difference between men and boys are the price of their toys.  All-in-all we had about 30 people come by and visit and have their photographs made with the dear old man. 
It was fun working with the children.  It is amazing how long some people could hold their breath.  During the day we even had a visit from a reporter from the Examiner Newspapers.  It seems Santa and his elf made it onto the front page of the West university Examiner.   To see samples of the photographs taken, please visit www.oceanicventures.net. 
In talking with Santa and Brittany Baakes, the manager of the City of West University Place athletic acilities, this is a fun event that both would like to make an annual event.  I for one will be back next year – it was a lot of fun and hopefully the weather will be as wonderful as it was this year.
Slán

Filed Under: Social Activities Tagged With: Christmas, Photograph, Santa, Scuba Dive Training

Footer

Contact Us

Oceanic Ventures, Inc
5808 Newcastle Dr.
Houston, TX 77401-3214
USA

Phone: 713-523-DIVE (3483)

eMail: divesafe@oceanicventures.net

Signup for our dive and scuba newsletters

Don’t miss news about the exciting happenings at Oceanic Ventures.


Map and Directions

Socialize

  • Email
  • Facebook

Why People Choose Us

People choose their friends carefully just as they should choose their adventure partners and Scuba Diving Instructors.  Oceanic Ventures is the premier scuba dive shop in Houston, Texas, and the Southwest because of our exceptional service and our sense of adventure.  In talking with our clients and friends, people choose us for a number of reasons such as: Passion – We love what we do and we want to share the beauty and excitement of the underwater world with everyone we meet. Caring- Our clients tell us they love us because we truly care about people and strive to make their scuba diving experiences safe, fun and enjoyable. Professional – Our staff members are the … [Read more …]

Copyright © 2026 all rights reserved Oceanic Ventures, Inc. · Sitemap · Log in